Setting Up Docker on macOS M1 Arm64 to Use Debian 10.4 Docker Engine
Contents
Introduction
This set of instructions eliminates the need to use the proprietary Docker Desktop for Mac on the Mac M1. First, we’ll start by launching a Debian Virtual Machine using UTM for Mac, which uses QEMU under the hood. After launching the VM, we’ll install openssh-server and enable it to start on boot. Then we’ll install Docker on the VM and verify the installation with the arm64v8/hello-world Docker image.
Afterwards, we’ll learn about how to run a docker container from the Debian image using the Docker CLI on Debian and how we can access the container through SSH port forwarding from the macOS host.
Once we learn about how SSH port forwarding works with the VM, we’ll use SSH forwarding to tunnel a Unix socket from the macOS host to the Debian /var/run/docker.sock Docker Engine socket. At this point, we’ll be launching Docker containers using the Docker CLI on macOS but running the containers in the Debian 10.4 Virtual Machine.
Installing UTM, Debian 10.4 Minimal on macOS, and launching the Debian VM

Options for virtualization on the Mac M1 are few compared to Intel machines. One option which works well is UTM. If you don’t already have UTM, download it from the UTM website. After installing UTM, visit the UTM gallery and download the Debian 10.4 ARM Minimal VM image. It will work out of the box and only have a console/terminal shell.
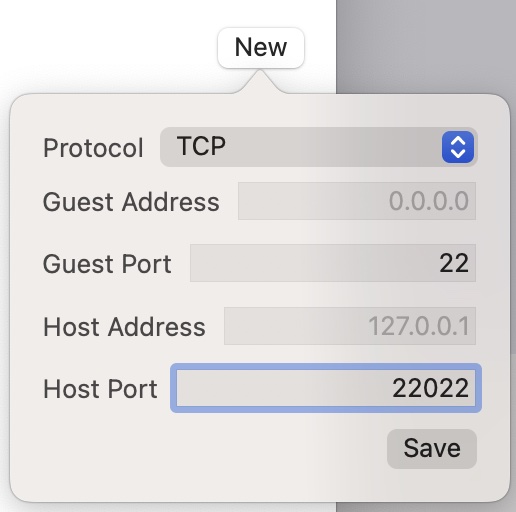
Before starting the VM, let’s configure the VM to forward port 22022 on the host to port 22 on the guest VM.
- At the top right, click the “settings” icon, and then click the “Network” tab.
- On the right side of the popup window, click “New”

- In the dialog that opens, enter 22022 for the host port and 22 for the guest port, and click “Save”
From within UTM, start the VM by clicking the big “Play” button. Once it boots, login using username/password “debian” and “debian”.
Verify the OpenSSH Server is installed and running
We’ll need to use SSH tunneling for both ports and a socket, so we’ll verify the latest version of OpenSSH is installed and running on port 22. We’ll run these commands within the VM.
|
|
It should say openSSH is already at the latest version.
|
|
This confirms the SSH server is running and listening on port 22. If you need more help with that, PhoenixNap has a great tutorial on How to Enable SSH on Debian.
Installing Docker on the Debian 10.4 VM
We’ll need to install docker on the Debian VM. Follow the instructions here on PhoenixNap’s How to Install Docker on Debian 10, and under Step 3, use Method 1. However, on number 2 in Step 3, where you add the Docker repository to your system repository, be sure to change the architecture from amd64 to arm64. That line will end up looking like this:
|
|
(Method 2 works if your VM has a GUI, but for using the VM as a replacement to Docker Desktop’s VM, we don’t need the overhead of a GUI.)
On Step 4, verify Docker is setup with the hello-world image. However, we’ll need to use the arm64 hello world image instead of the standard amd/Intel one:
|
|
We’ll see the confirmation message that Docker is now installed on Debian 10 successfully.
Configuring Mac OS host Docker CLI to use Debian’s Docker Engine.
Since we only need the Debian VM to host the Docker Engine and container images, and since most of our source code and projects are on the macOS host, we won’t need to run any commands in the Debian VM directly. Instead, we’ll configure the macOS Docker CLI to communicate with the Docker Engine on the Debian VM. On macOS, create a Unix socket tunnel via SSH, using the port 22022 we configured earlier in the UTM interface:
|
|
If you’ve never created an SSH tunnel before, what you’ll see after running this command is no output, if it’s successful.
Running the above command points a custom socket we create, “/tmp/docker-on-debian.sock” to the socket which the Docker client uses to connect to the Docker Engine, except we’re connecting it to the socket on the Debian VM instead of the Docker Desktop Engine. Once that’s running, we’ll point the local Docker CLI client to the Docker Engine running on Debian by setting an environment variable, which tells the CLI to use a different socket instead of the default one.
On macOS, set the DOCKER_HOST environment variable to point to the custom socket tunnel we created in the previous step:
|
|
We’ll get “permission denied” when trying to use the Docker CLI from macOS. This is because the debian user doesn’t have permissions to use Docker without using sudo. To fix this, on the Debian VM, we’ll run the following command to add the debian user to the docker user group:
|
|
Now the Docker CLI will connect to the Debian VM instead. We will confirm this by running docker system info | grep System from the macOS terminal to see that the operating system is Debian, not Darwin or macOS:
|
|
Instead, we see the OS is Debian GNU/Linux 10, and this confirms the macOS Docker CLI is communicating with the Debian Docker Engine.
If Docker for Mac is running and we run the same command in a terminal that doesn’t have DOCKER_HOST set, we see that the OS is “Docker Desktop”
|
|
We can also run a container image, from the macOS terminal, and confirm that the container is running in Debian. We’ll first confirm that there are no containers created, since this is a fresh install, by running docker ps -a on both macOS and Debian:
|
|
Now, we’ll launch the hello-world container from the macOS terminal:
|
|
From both macOS and Debian, we’ll see that the container launched, printed the confirmation message, and then exited, and we can see this from both macOS and Debian:
From macOS:
|
|
From Debian:
|
|
Since we don’t need the hello-world container, we’ll remove it. We can remove it by running docker CLI in the Debian VM, or even better, from our macOS terminal:
|
|
We can confirm the container is removed by running the CLI from either Debian or macOS:
|
|
At this point, it should be clear that, when DOCKER_HOST is set, and when the Unix SSH tunnel is activated, running the Docker CLI in either the macOS host or the Debian VM interacts with Docker Engine on Debian, not Docker Desktop.
For running more substantial containers, such as a Selenium/Standalone-Chrome container with ports 4444 and 5900 open, so we can, for instance, run end to end tests and VNC into the container, we’ll need to use either port forwarding or SSH port tunneling. UTM’s configuration screen allows mapping ports on the host to ports on the Debian VM, but we must configure it with virtual machine powered off. Powering down the VM everytime we need to add/remove a port mapping is tedious. Instead, we’ll use SSH port forwarding (or tunneling) to instantly tunnel through the ports from the inside of the VM itself.
On the Mac M1, the standard selenium/standalone-chrome Docker images won’t run properly since they’re built for the platform “linux/amd64”. Instead, we need to use images built for “linux/arm64”. Fortunately, there are images available which support the arm64 platform, thanks to Samuel Cochran of Melbourne, Australia. You can learn more about the <a href=“https://github.com/sj26/docker-selenium" target=_blank” rel=“nofollow noopener”>“Seleniarm images” in his GitHub repository. Since Google has not released an ARM64 build of Chrome for Linux, we instead settle with Chromium for Linux.
To launch a seleniarm/standalone-chromium image as a container, we’ll use this command from our Mac host terminal:
|
|
Once the container starts successfully, in the terminal output, we’ll see a Selenium Server listening on port 4444, and a VNC server listening on port 5900. But when we try to visit localhost:4444 in the browser, we get page not found. This is because we only enabled port forwarding in UTM for port 22022 on the host to port 22 in the VM. All other ports are not forwarded. So it’s here that we’ll need to use SSH port forwarding to open the ports on the Debian VM in order to forward the traffic to ports 4444 and 5900 on the container.
In macOS, in a different terminal, run the SSH tunneling command:
|
|
Once done, we refresh the localhost:4444 page and now see the Selenium Server dashboard. Additionally, using VNC Viewer, we can connect to the container at 127.0.0.1:5900.
You might be wondering how we’re able to use VNC to see a desktop when Debian 10.4 Minimal is a console-only VM. Using Docker, we’ve launched a container, which is running on Debian 10.4, has xvfb, x11, fluxbox, and the Chromium browser installed. Note that, when we VNC into this container, we’re first passing through our Debian 10.4 VM and then being redirected to another Debian 10.4 instance running in a Docker container, except this instance has a graphical desktop installed, albeit a minimal one.
If you are using Selenium Webdriver, WebdriverIO, or any other testing framework which can talk to a Selenium server via port 4444, you can run your tests and confirm they run in the container. While this example assumes you’re running a Docker Selenium image, we can easily run a Java app, Node.js app, or any other app in a container and communicate with it. For instance, if we run a Node.js Hello World Web Server in a container listening on port 3000, as long as we create an SSH tunnel for port 3000, we can load the page in the browser via localhost:3000.
As an aside, I tried to see if I can combine the command to start a container with the SSH tunnel: docker run –rm -p 4444:4444 -p 5900:5900 –shm-size 3g seleniarm/standalone-chromium:4.0.0-beta-1-20210215 & ssh debian@127.0.0.1 -p 22022 -N -L5900:127.0.0.1:5900 -L4444:127.0.0.1:4444
But when using CTRL-C, it only terminates the SSH port forwarding, not the container. If the commands are reversed, then CTRL-C stops the container but then we need to close the SSH port forwarding manually with ps and kill.
I put this example together based on information I read in a Podman issue on GitHub, where many people were attempting to use the Docker CLI on macOS to connect to a Podman Engine in a VM. Podman uses Unix sockets in the same manner as Docker. There’s also a Podman Machine Client created by the Podman team, which launches a Linux VM and runs Podman in it so Mac users can use Podman. That was my inspiration for trying to create a Linux VM to run Docker containers without the proprietary Docker Desktop for Mac. Under the hood, Docker Desktop for Mac simply creates a Linux VM, so using Debian instead shouldn’t create any extra resource overhead than what we’d experience using Docker Desktop.
There are also various open source Podman Desktop GUIs to make it easier to setup Podman for Mac (and possibly Windows) using either Fedora, CentOS, or Ubuntu/Debian virtual machines. I’ll add links to some extra reading materials for anyone interested in digging in further.
Someone also created podman desktop, a script to make it easier to setup Podman on macOS. Again, I can see how some of the steps of creating SSH Unix sockets and forwarding ports through SSH could be automated when running the docker run command.
What I’ve learned from this process is that we could create an open source Docker Desktop, which simply starts up the Debian VM, sets the DOCKER_HOST variable, creates the SSH Unix socket tunnel, and also aliases docker run so that we also create SSH tunnels for ports. This would create a seamless user experience so that no extra commands are needed in order to run Docker on the Mac M1 for free.
For Intel Mac users, I imagine the process would be similar, except we could use VirtualBox to run Linux instead of UTM. For Windows users, Docker Desktop also launches a Linux VM, so a similar approach may work, except I’m not sure how to setup the SSH sockets and port forwarding on Windows, as it’s been years since I’ve regularly run a Windows box. It’s possible that may not be an issue due to VirtualBox’s bridged networking features.
On macOS, we can simplify some of the setup by setting the DOCKER_HOST environment variable in our .bashrc and/or .bash_profile shell scripts:
|
|
Next time we open a new terminal on the Mac, the variable is set for us automatically. However, should you ever want to roll back to the proprietary Docker for Desktop on Mac, you’ll need to remove this line from the .bashrc and .bash_profile scripts, so the Docker CLI will connect to the default Docker socket.
While I’ve confirmed I can run Docker containers and access them via forwarded ports, I haven’t tested everything. For instance, I’m not sure how volume mounting will work and if we’ll need to do anything special to share folders between the host and the containers. I also saw a warning about there being no swap limit support when running docker system info. I’m not sure what this warning alludes to at this point without more research.
I also don’t know yet if there’s more we can do to optimize the VM. It has 1024 MB of RAM allocated to it and a disk size of 3.43 GB. This is with Node.js installed, as I had tried running a Node.js Hello World server to confirm I could also run a Node.js app. In theory, we don’t need the Debian VM for anything except Docker, so uninstalling all unnecessary tools and services could save resources, if this is important to you.
Another thing I’ve considered looking into is mapping a shared drive between the Debian VM and the macOS host so that all of the Docker images and containers are stored on the macOS filesystem, not on the VM. If we make the VM stateless, then we avoid losing downloaded images and saved containers if the VM becomes corrupted. While I’ve not experienced this yet with qcow2 disk images, I have had a VirtualBox disk image become corrupted when my system ran out of memory. It refused to boot, saying the image was corrupted.
With Debian as the Docker virtual machine, we’re not violating any of Docker’s new terms for organizations with more than 250 employees and $10 million in revenue, and this means we don’t need to seek permission from any finance people in order to approve the purchase of any software subscriptions. We can uninstall Docker Desktop and still run Docker locally, as long as we’re willing and able to jump through a few hoops and learn some new things in the process.
Resources:
Last Modified on 2021-09-26
Author James Mortensen

Hi James,
First of all thank you for your great post and job regarding selenium+arm.
We tried seleniarm/standalone-chromium:latest on M1 and could not make it work, presumably because of some security issue (whitelist-ip or something)
We could make it work using this version: seleniarm/standalone-chromium:4.5.3-20221025
That would be great if you can help us on what we are doing wrong, why latest version is not working for us.
Our stack is based on Symfony/Php, using Behat/Mink. When our web container contacts your works fine until some javascript action is required.
If you need further information, please don’t hesitate to let me know.
Thank you very much in deed.
Regards,
Samuel